

Ombre Velvet Layer Cake
Print
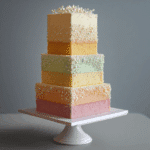
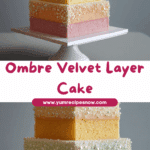
Ombre Velvet Layer Cake
This stunning Ombre Velvet Layer Cake features layers of moist, tender cake in graduating shades of pink, frosted with a smooth and creamy buttercream. Perfect for special occasions like birthdays or baby showers.
- Prep Time: 45 minutes
- Cook Time: 25 minutes
- Total Time: 1 hour 10 minutes
- Yield: 1 4-layer 6-inch cake 1x
- Category: Dessert
- Method: Baking
- Cuisine: American
- Diet: Vegetarian
Ingredients
Scale
- 2 1/2 cups all-purpose flour
- 1 1/2 cups granulated sugar
- 1 tsp baking powder
- 1/2 tsp baking soda
- 1/2 tsp salt
- 1 cup buttermilk, room temperature
- 1/2 cup unsalted butter, softened
- 1/2 cup vegetable oil
- 4 large eggs, room temperature
- 1 tbsp vanilla extract
- Pink food coloring (gel preferred)
- 2 cups unsalted butter (for frosting), softened
- 6 cups powdered sugar
- 1/4 cup heavy cream
- 1 tbsp vanilla extract (for frosting)
- Pinch of salt (for frosting)
Instructions
- Preheat the oven to 350°F (175°C). Grease and line four 6-inch cake pans.
- In a large bowl, mix flour, baking powder, baking soda, and salt. Set aside.
- In another bowl, cream together the butter, oil, and sugar until light and fluffy.
- Add eggs one at a time, beating well after each addition. Stir in vanilla extract.
- Alternate adding dry ingredients and buttermilk to the wet mixture, beginning and ending with the dry ingredients. Mix just until combined.
- Divide batter evenly into four bowls. Tint each with increasing amounts of pink food coloring to create an ombre effect.
- Pour each tinted batter into a prepared pan and smooth the tops. Bake for 20–25 minutes or until a toothpick comes out clean.
- Cool the cakes in pans for 10 minutes, then transfer to wire racks to cool completely.
- To make the frosting, beat softened butter until creamy. Gradually add powdered sugar, then vanilla, cream, and salt. Beat until fluffy.
- Level cake layers if needed. Stack the cake starting from darkest to lightest layer, spreading buttercream between each.
- Frost the outside of the cake with remaining buttercream. Smooth with a spatula and decorate as desired.
Notes
- Use gel food coloring for more vibrant shades without altering the batter consistency.
- Ensure all ingredients are at room temperature for best mixing results.
- Cake layers can be made a day ahead and refrigerated.
Nutrition
- Serving Size: 1 slice (1/12 of cake)
- Calories: 520
- Sugar: 45g
- Sodium: 210mg
- Fat: 28g
- Saturated Fat: 16g
- Unsaturated Fat: 10g
- Trans Fat: 1g
- Carbohydrates: 65g
- Fiber: 1g
- Protein: 4g
- Cholesterol: 95mg
Keywords: ombre cake, velvet cake, layer cake, birthday cake, pink cake, celebration dessert