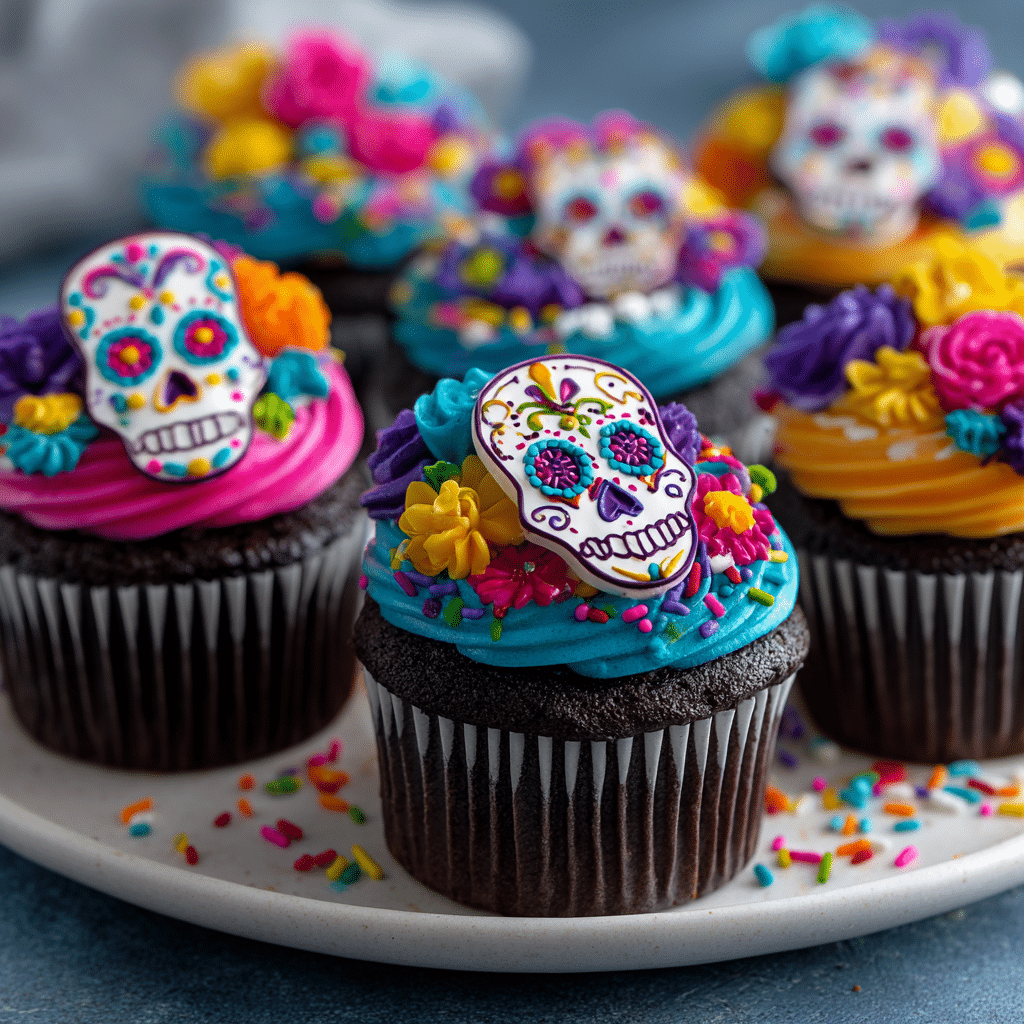
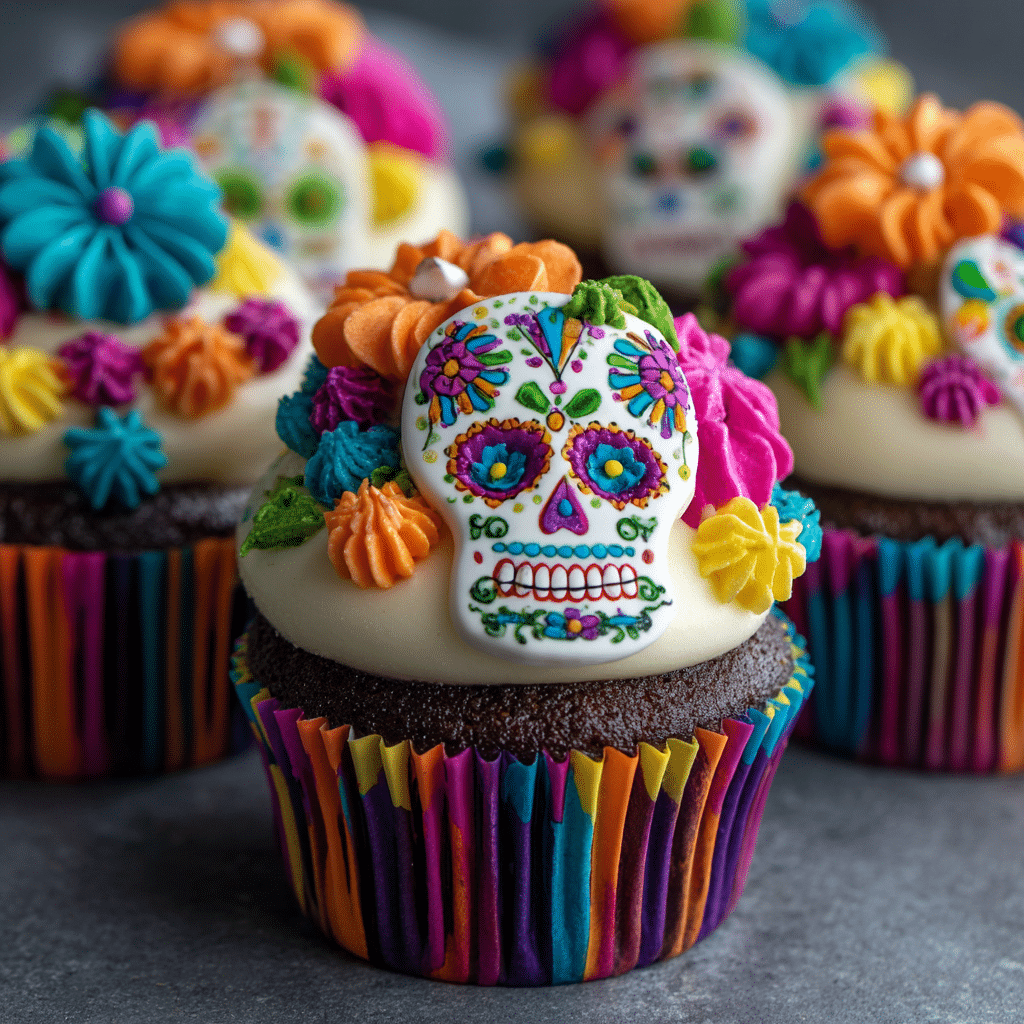
Day of the Dead Cupcakes Recipe
If you are looking to add an unforgettable, vibrant twist to your Halloween or festive celebrations, these Day of the Dead Cupcakes are the perfect treat to create. Bursting with color and detail, these cupcakes combine rich chocolate cake with bright orange buttercream and charming, hand-decorated fondant toppers inspired by traditional sugar skull designs. Each element comes together to celebrate the joyful spirit and beautiful artistry of this meaningful holiday in a way that everyone will love to devour. Trust me, these cupcakes won’t just be dessert—they’ll be the life of the party and a feast for the eyes too!

Ingredients You’ll Need
Every ingredient in these Day of the Dead Cupcakes plays a vital role in building layers of flavor, texture, and color. It’s a simple list but essential for achieving those eye-catching details and that perfect moistness inside.
- White fondant: This smooth, pliable sugar dough forms the canvas for your colorful Day of the Dead designs.
- Royal icing tinted hot pink, yellow, aqua, and black: These vibrant colors bring the intricate skull patterns to life with precision and charm.
- Chocolate cupcakes: Rich, moist cupcakes provide a delicious, dark base that contrasts beautifully with bright decorations.
- Buttercream frosting tinted orange: The creamy, tangy frosting complements the chocolate and adds festive color and texture to the final cupcake.
How to Make Day of the Dead Cupcakes
Step 1: Prepare Your Fondant Toppers
Start by lightly dusting your work surface with powdered sugar to keep the fondant from sticking. Roll the white fondant out until it’s about 1/8-inch thick, which is perfect for your detailed toppers—thin enough to be delicate but substantial enough to hold the design.
Step 2: Cut Fondant Circles
Use a 2 1/2-inch diameter cookie cutter to punch out circles from the fondant. These circles will become the base of your Day of the Dead Cupcakes’ sugar skull faces, so make sure they’re uniform for consistency.
Step 3: Outline Facial Features
With a toothpick, gently mark where you want the eyes and nose to be on each fondant circle. These light guidelines will help keep your royal icing designs neat and symmetrical.
Step 4: Pipe the Eye Details
Using a #3 piping tip, create eight long hot pink teardrop shapes arranged around the eye area in an asterisk pattern—this vibrant burst instantly draws attention. Then, switch to a #4 piping tip to fill the centers with bright yellow icing, making the eyes pop with sunny color.
Step 5: Add Temple Decorations
Pipe large yellow dots at the temples for cheerful accents, weaving more of the joyful colors that are emblematic of the Day of the Dead tradition into your designs.
Step 6: Create the Nose and Mouth
With a #1 piping tip, pipe an upside-down black heart to form the nose. Then carefully outline the smile and teeth in black royal icing, giving your skull a friendly and festive expression.
Step 7: Add Forehead and Cheek Details
Pipe a heart in aqua royal icing at the center of the forehead, followed by small aqua dots around the yellow temple elements and elegant aqua scrolls on the cheeks. These details add a delicate but captivating touch.
Step 8: Final Decorative Touches
Finish by piping a large black dot above the forehead heart, flanked by smaller black dots and comma shapes. Accent these with yellow dots above the black shapes and above each eye to create a balanced, colorful design. Let your beautiful toppers dry and harden overnight for best results.
Step 9: Assemble the Cupcakes
Top your cooled chocolate cupcakes with the orange buttercream frosting, then gently press a hardened fondant topper onto each one. This careful finishing touch transforms ordinary cupcakes into festive works of art.
How to Serve Day of the Dead Cupcakes
Garnishes
Add edible glitter, tiny sugar flowers, or even colorful sprinkles that complement the royal icing colors to enhance the festive vibe. A light dusting of edible shimmer powder can also catch the light and elevate the presentation instantly.
Side Dishes
These cupcakes pair wonderfully with warm drinks like spiced hot chocolate or Mexican hot chocolate. You can also serve with a side of fresh fruit skewers to balance the richness of the chocolate and buttercream.
Creative Ways to Present
Arrange these Day of the Dead Cupcakes on a vibrant, fabric-covered platter or a tiered cake stand decorated with marigold flowers to channel traditional holiday aesthetics. Consider placing sugar skull figurines or papel picado around the display for an immersive celebration centerpiece.
Make Ahead and Storage
Storing Leftovers
If you have any Day of the Dead Cupcakes left, store them in an airtight container at room temperature for up to two days. This keeps the buttercream fresh and the fondant toppings intact without becoming soggy.
Freezing
You can freeze the cupcakes without toppers for up to three months by wrapping them individually in plastic wrap and placing them in a freezer-safe container. When ready to enjoy, thaw at room temperature and decorate with fresh fondant toppers once unfrozen.
Reheating
Reheating is not recommended for these cupcakes since the fondant and royal icing decorations are best served at room temperature to preserve their shape and texture. Instead, let frozen cupcakes thaw naturally before serving.
FAQs
Can I use store-bought fondant and royal icing?
Absolutely! Store-bought fondant and royal icing make this project easier, though homemade versions can add a personal touch. Just be sure to tint the royal icing with vibrant gels to match the lively Day of the Dead colors.
How long do the frosting and toppers stay fresh?
The buttercream frosting is best enjoyed within two days when kept at room temperature, while the fondant and royal icing toppers, if stored separately in a cool, dry place, can last up to a week without losing their firmness.
Can I adapt this recipe for gluten-free cupcakes?
Yes, you can use a gluten-free chocolate cupcake recipe as your base. Just be sure all other ingredients, including fondant and icing, are certified gluten-free to keep the entire treat safe.
Is it difficult to pipe the royal icing details?
The detailed piping takes patience but is very doable with a steady hand and practice. Consider practicing the designs on parchment paper first to build your confidence before decorating the fondant circles.
What if I want more colors for the royal icing decorations?
Feel free to experiment with additional colors—you can add bright purples, reds, or greens to customize your Day of the Dead Cupcakes. Just ensure the colors complement your overall design for a harmonious look.
Final Thoughts
Making Day of the Dead Cupcakes is not only a delightful baking adventure but also a wonderful way to honor and celebrate a cherished tradition with friends and family. The combination of rich chocolate, vibrant frosting, and intricate fondant art creates a dessert that’s as joyful to look at as it is to eat. I cannot wait for you to try these cupcakes for your next party—they are sure to bring smiles and spark conversation, becoming a beloved staple for your festive gatherings!