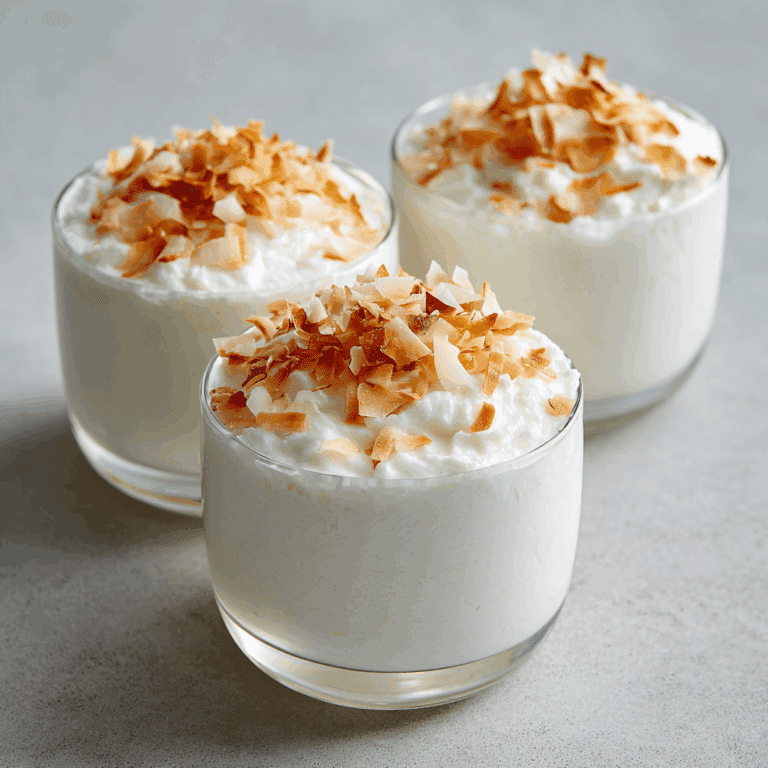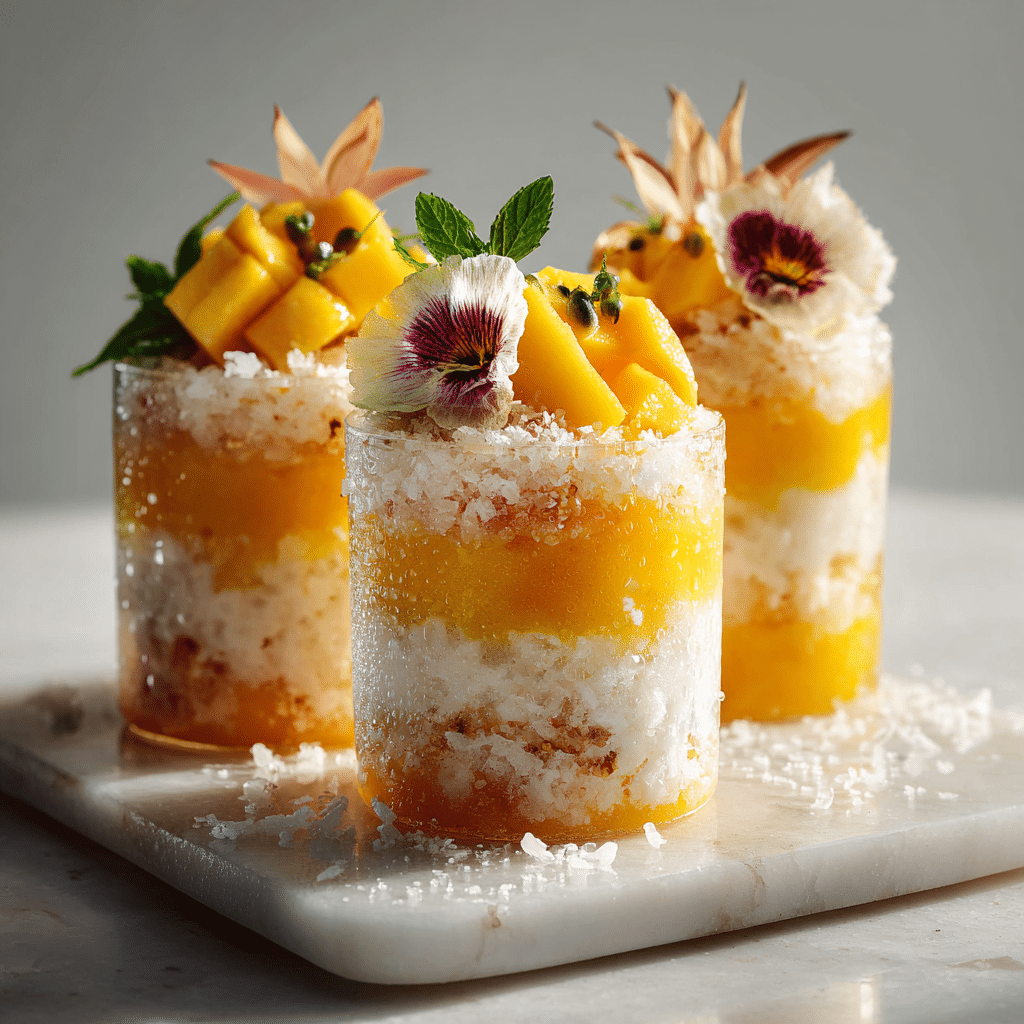
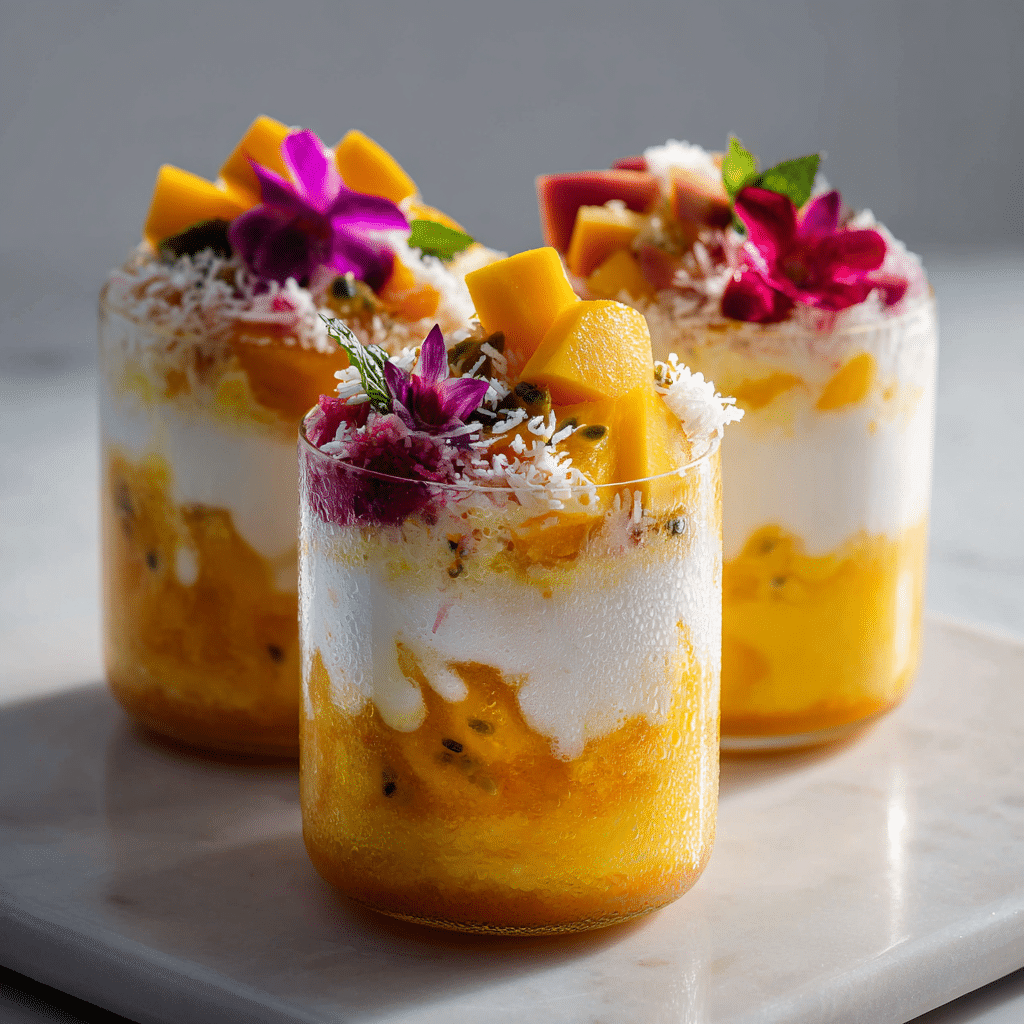
Mango Coconut Snow Cups Recipe
If you’ve been dreaming of a dessert that transports you straight to a sunny beach with every bite, let me introduce you to the irresistible Mango Coconut Snow Cups. This delightful treat pairs fluffy shaved ice with luscious mango puree and velvety coconut cream, creating a perfect harmony of tropical flavors and refreshing textures. Whether you need a cooling dessert on a warm day or a charming finish to a dinner party, Mango Coconut Snow Cups will become your new favorite indulgence.

Ingredients You’ll Need
The beauty of Mango Coconut Snow Cups lies in its simplicity—just a few carefully chosen ingredients come together to deliver a burst of tropical goodness. Each one plays a vital role: the mango puree brings vibrant sweetness and color, the coconut cream adds rich creaminess, and the shaved ice provides that snow-like lightness you’ll adore.
- Fresh mangoes: Ripe and juicy mangoes are the star, offering natural sweetness and a bright orange hue.
- Shaved ice: Fluffy and fine, it forms the cool, snow-like base that makes this dessert so refreshing.
- Coconut cream: Thick and silky, it introduces a luscious tropical flavor and smooth texture.
- Sweetened condensed milk: Adds a touch of creamy sweetness, balancing the tartness of mango.
- Fresh lime juice: A splash to brighten up the overall flavor and add a subtle tang.
How to Make Mango Coconut Snow Cups
Step 1: Prepare the Mango Puree
Start by peeling and chopping your ripe mangoes into chunks. Blend them until smooth to create a bright, velvety puree that forms the fruit-forward heart of your dessert. If you want an extra hint of freshness, stir in a teaspoon of fresh lime juice to give it a lively zing.
Step 2: Shave the Ice
Next, it’s time to work on the icy base. Use a shaved ice machine or finely crush ice in a blender to achieve a fluffy, snow-like texture. The finer the ice, the better it will meld with the creamy toppings and the mango puree, creating that signature light and airy mouthfeel.
Step 3: Whip the Coconut Cream
Chill your can of coconut cream, then scoop out the thick, solid part and whip it until light and fluffy—just like whipped cream! This whipped coconut cream will add richness and a velvety finish that perfectly complements the icy mango.
Step 4: Assemble the Mango Coconut Snow Cups
In your serving glasses or bowls, start by adding a generous scoop of shaved ice. Spoon over a layer of mango puree, then dollop the whipped coconut cream on top. Repeat layers if your serving container is tall, finishing with a flourish of coconut cream for that picture-perfect look.
How to Serve Mango Coconut Snow Cups
Garnishes
Add an extra touch of elegance by decorating your Mango Coconut Snow Cups with fresh mango cubes, toasted coconut flakes, or a sprig of mint. These little additions bring texture, color contrast, and an inviting aroma, making the dessert as charming to look at as it is to taste.
Side Dishes
This dessert shines on its own but pairs beautifully with light, fruity accompaniments. Consider serving it alongside tropical fruit salads, coconut biscuits, or even a scoop of passion fruit sorbet for a truly indulgent experience that keeps the island vibes flowing.
Creative Ways to Present
Take your presentation up a notch by serving Mango Coconut Snow Cups in hollowed-out pineapple shells or elegant glass jars. Layering the components in clear glass lets the vibrant colors pop, tempting your guests’ eyes before their taste buds get to enjoy the magic inside.
Make Ahead and Storage
Storing Leftovers
Mango Coconut Snow Cups are best enjoyed fresh for maximum texture and flavor. However, if you have leftovers, store them in airtight containers in the fridge for up to one day. Keep in mind that the shaved ice will melt over time, so the texture may soften.
Freezing
If you want to keep elements for later, freeze the mango puree and coconut cream separately in airtight containers. When ready to serve, thaw them briefly in the fridge and shave fresh ice to assemble. This way, your Mango Coconut Snow Cups stay fresh and delicious with minimal fuss.
Reheating
Since this is a refreshing cold dessert, reheating isn’t recommended. Instead, focus on keeping your ingredients fresh and assembling just before serving to capture that perfect icy and creamy balance.
FAQs
Can I use frozen mangoes for the Mango Coconut Snow Cups?
Yes! Frozen mangoes work well and make the mango puree even cooler and thicker, perfect for a refreshing dessert. Just thaw them slightly before blending for best results.
Is there a dairy-free option for this recipe?
Absolutely. This recipe is naturally dairy-free if you use coconut cream instead of whipped cream and skip any added condensed milk or find a dairy-free version. It’s a superb choice for those avoiding dairy.
What’s the difference between coconut cream and coconut milk?
Coconut cream is thicker and richer, which makes it ideal for whipping and adding a creamy texture to desserts. Coconut milk is more liquid and less concentrated, so coconut cream is preferred for Mango Coconut Snow Cups.
Can I prepare Mango Coconut Snow Cups without a shaved ice machine?
Yes, you can finely crush ice in a strong blender or food processor until it has a snow-like texture. Just be careful not to blend for too long to avoid turning it into slush.
How long does the dessert last once assembled?
Once assembled, it’s best eaten immediately because the shaved ice will start to melt and the texture will change. Enjoy it fresh for the ideal balance of flavors and textures.
Final Thoughts
Mango Coconut Snow Cups are a dreamy combination of tropical sweetness, creamy indulgence, and icy refreshment. Whether you’re surprising guests or treating yourself to a delightful escape from the everyday, this dessert brings sunshine to any table. Give it a try, and I promise Mango Coconut Snow Cups will become your go-to summer favorite that you’ll want to make over and over again!