Chocolate Mousse Brownies Recipe
“`html
If you have a serious sweet tooth and love the rich, velvety combination of textures, this Chocolate Mousse Brownies Recipe is about to become your new favorite indulgence. Imagine biting into a fudgy, tender brownie base topped with a light, airy chocolate mousse, all crowned with a glossy, luscious ganache that melts in your mouth. This dessert delivers a perfect harmony of flavors and a showstopping presentation that will impress anyone lucky enough to try it. Let me walk you through everything you need to know to make this heavenly treat come to life in your kitchen.
Ingredients You’ll Need
This Chocolate Mousse Brownies Recipe uses simple, easy-to-find ingredients that come together to create complex, irresistible layers of flavor and texture. Each component plays an essential role in giving you that perfect balance of fudginess, creaminess, and shine.
- Unsalted butter (1/2 cup or 115g): Melted for richness and moistness in the brownie base.
- Granulated sugar (1 cup or 200g): Adds sweetness and structure to the brownies.
- Eggs (2 large): Bind and give lift to the brownie batter.
- Vanilla extract (1 tsp): Enhances and deepens the chocolate flavor.
- Unsweetened cocoa powder (1/3 cup or 40g): For that deep, intense chocolate taste in the brownies.
- All-purpose flour (1/2 cup or 65g): Provides the perfect tender crumb.
- Salt (1/4 tsp): Balances sweetness and boosts the chocolate notes.
- Baking powder (1/4 tsp): Helps the brownie rise slightly without losing its fudgy texture.
- Heavy whipping cream (1 1/2 cups or 350ml): Used chilled to whip into the airy mousse and to make the silky ganache.
- Semisweet chocolate (8 oz for mousse and 4 oz for ganache, finely chopped): Provides that irresistible creamy chocolate flavor throughout.
- Milk (3 tbsp or 45ml): Warmed to melt chocolate smoothly for the mousse base.
- Powdered sugar (2 tbsp or 25g): Sweetens and stabilizes the mousse beautifully.
How to Make Chocolate Mousse Brownies Recipe
Step 1: Make the Brownie Base
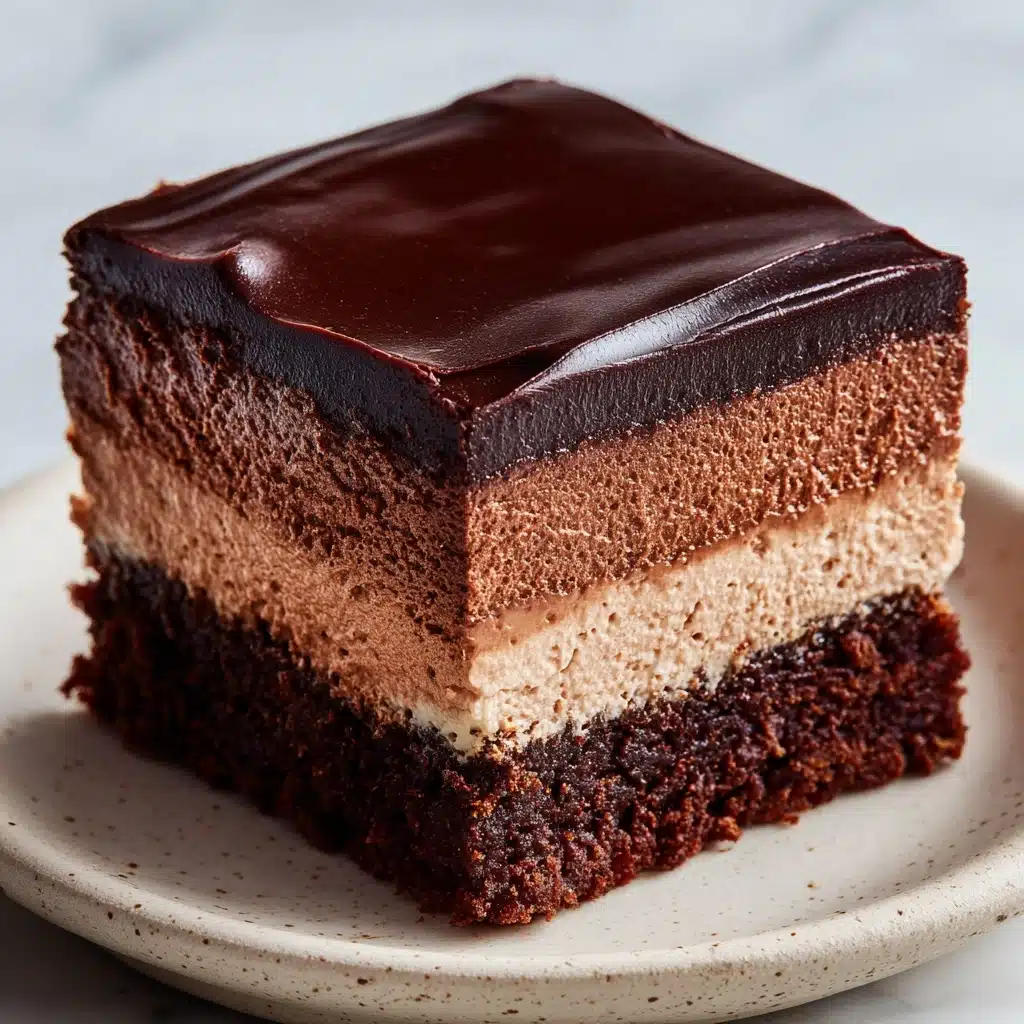
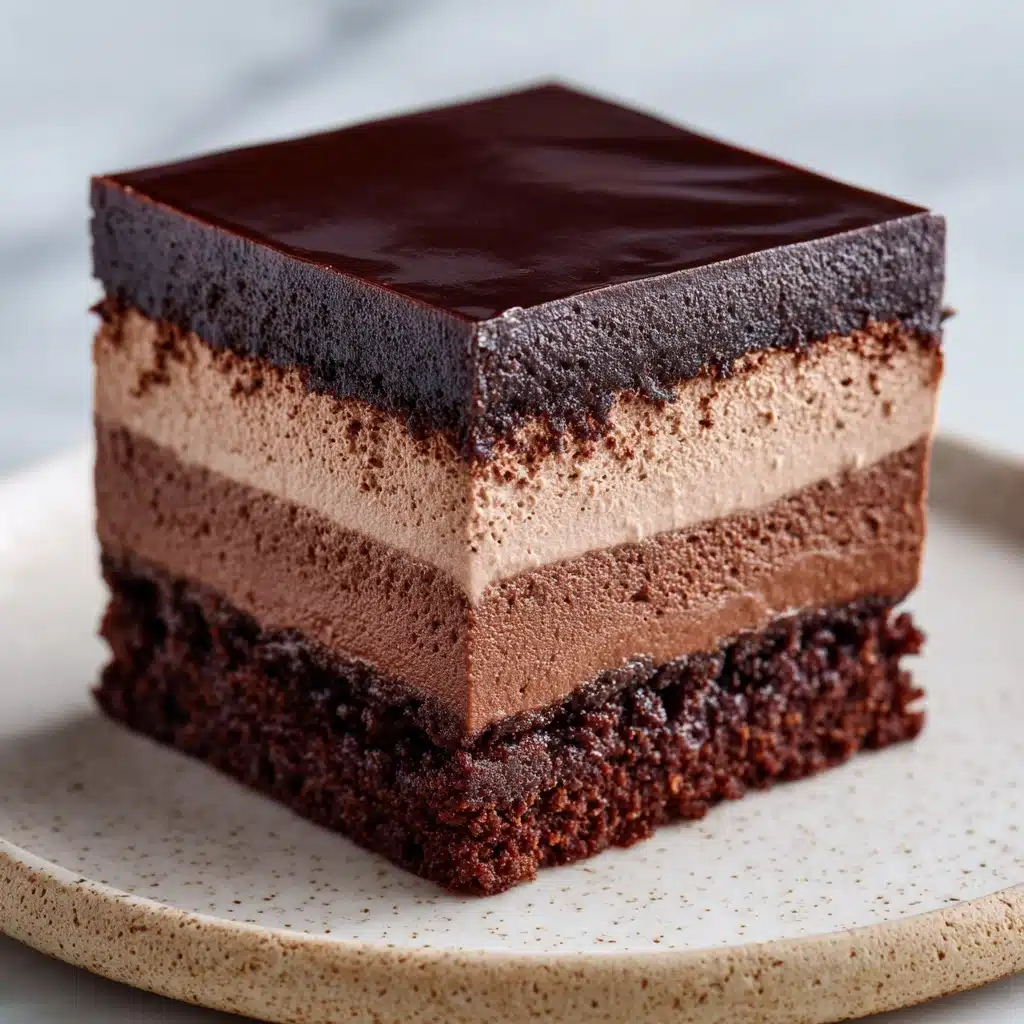
Start by preheating your oven to 350°F (175°C) and lining an 8×8-inch baking pan with parchment paper to ensure those brownies come out easily. In a large bowl, whisk together melted butter, granulated sugar, eggs, and vanilla until the mixture is smooth and glossy. Sift in the cocoa powder, flour, salt, and baking powder, then gently fold everything together to combine—remember, a light hand keeps the brownies tender and fudgy. Pour this luscious batter into your prepared pan and smooth the top. Bake for 20 to 25 minutes until a toothpick inserted comes out with just a few moist crumbs. Let the brownies cool completely right in the pan, so you don’t disturb their delicate crumb.
Step 2: Prepare the Chocolate Mousse
This is where the magic really begins. Gently heat the milk until just steaming, then pour it over the chopped semisweet chocolate in a heatproof bowl. Let it rest for a couple of minutes to melt the chocolate, then stir until silky smooth and uniform. Allow this mixture to cool until it’s fluid but no longer warm—this step helps your mousse hold its airy texture. In a separate bowl, whip the cold heavy cream and powdered sugar until soft peaks form that hold shape but still look fluffy. Fold the chocolate mixture gently into the whipped cream, taking care not to deflate that beautiful mousse airiness. Spread this mousse evenly over your cooled brownie layer and pop it in the fridge for at least two hours to set firmly.
Step 3: Top with Ganache
For the final decadent touch, place the chopped chocolate in a heatproof bowl, heat your heavy cream until it just starts to simmer, and pour over the chocolate. Let the mixture sit for 2 to 3 minutes before stirring it until glossy, smooth, and voluptuous. Pour this silky ganache over the chilled mousse layer, smoothing it out with an offset spatula for a perfectly even finish. Refrigerate once again for about an hour until the ganache firms up, creating a glossy, irresistible top for your masterpiece.
How to Serve Chocolate Mousse Brownies Recipe
Garnishes
To elevate this dessert, try garnishing with a dusting of cocoa powder or a sprinkle of finely chopped toasted hazelnuts for crunch. Fresh berries like raspberries or strawberries add pops of color and a bright contrast to the rich chocolate. For extra flair, a few delicate chocolate shavings or a light drizzle of caramel sauce can transform these brownies into a showstopper presentation that will wow your guests.
Side Dishes
These brownies are substantial all on their own, but if you want to balance the richness, serve alongside a scoop of vanilla bean ice cream or a dollop of lightly sweetened whipped cream. A cup of freshly brewed coffee or rich espresso also complements the deep chocolate flavors perfectly. For a seasonal twist, a fresh fruit salad or a simple citrus sorbet can refresh the palate between bites.
Creative Ways to Present
Why not try serving your Chocolate Mousse Brownies Recipe as individual mini parfaits? Layer brownie pieces, mousse, and ganache in small glasses and top with whipped cream and berries for a stunning presentation. Alternatively, cut the brownies into bite-sized squares and arrange on a platter with decorative edible flowers or gold leaf for a luxe dessert at your next dinner party. Your creativity here can make this classic recipe uniquely yours!
Make Ahead and Storage
Storing Leftovers
Your leftover brownies will keep beautifully in an airtight container in the refrigerator for up to four days. Keeping them chilled maintains the mousse’s delicate texture and the ganache’s shine, so you can enjoy that freshly made taste a little longer.
Freezing
You can freeze these brownies if you want to make them in advance or store extras. Wrap them tightly in plastic wrap and then in foil before placing in the freezer to protect against freezer burn. For best results, freeze for up to 2 months. When ready to eat, thaw overnight in the refrigerator to preserve the mousse’s creamy texture.
Reheating
Since this dessert is served chilled, reheating is not recommended—it will affect the mousse’s delicate balance and ganache texture. If you prefer it less cold, simply let the brownies sit at room temperature for about 20 minutes before serving.
FAQs
Can I use milk chocolate instead of semisweet chocolate for the mousse?
Yes, you can substitute milk chocolate, but keep in mind it will make the mousse sweeter and less intense in chocolate flavor. Adjust the powdered sugar accordingly if you prefer a less sweet dessert.
Is it possible to make this recipe gluten-free?
Absolutely! Simply replace the all-purpose flour with a gluten-free flour blend that measures cup-for-cup the same. Be sure your cocoa powder and other ingredients are certified gluten-free to avoid cross-contamination.
Can I prepare the layers in advance?
Definitely. You can bake the brownie base a day ahead, then prepare and add the mousse and ganache layers the next day. This makes it super convenient for special occasions when you want to minimize last-minute prep.
What’s the best way to get clean slices when cutting these brownies?
Use a sharp knife warmed in hot water and wiped dry before slicing. This will help the ganache and mousse layers cut smoothly without tearing, giving you beautiful, clean edges.
Can I substitute heavy cream with a lighter alternative?
For the best texture and richness, heavy cream is recommended. Using lighter cream or milk alternatives will not whip properly or set into a stable mousse, which could compromise the recipe’s results.
Final Thoughts
Now that you’ve got the full scoop on how to create this luxurious Chocolate Mousse Brownies Recipe, I hope you’re as excited as I am for you to try it out! It’s a truly special treat that combines the best of all worlds—fudgy, airy, and glossy—in one unforgettable bite. So gather your ingredients, invite some friends or family, and get ready to indulge in a dessert that’s destined to become a beloved classic in your home.
“`