Coconut Fudge Macarons Recipe
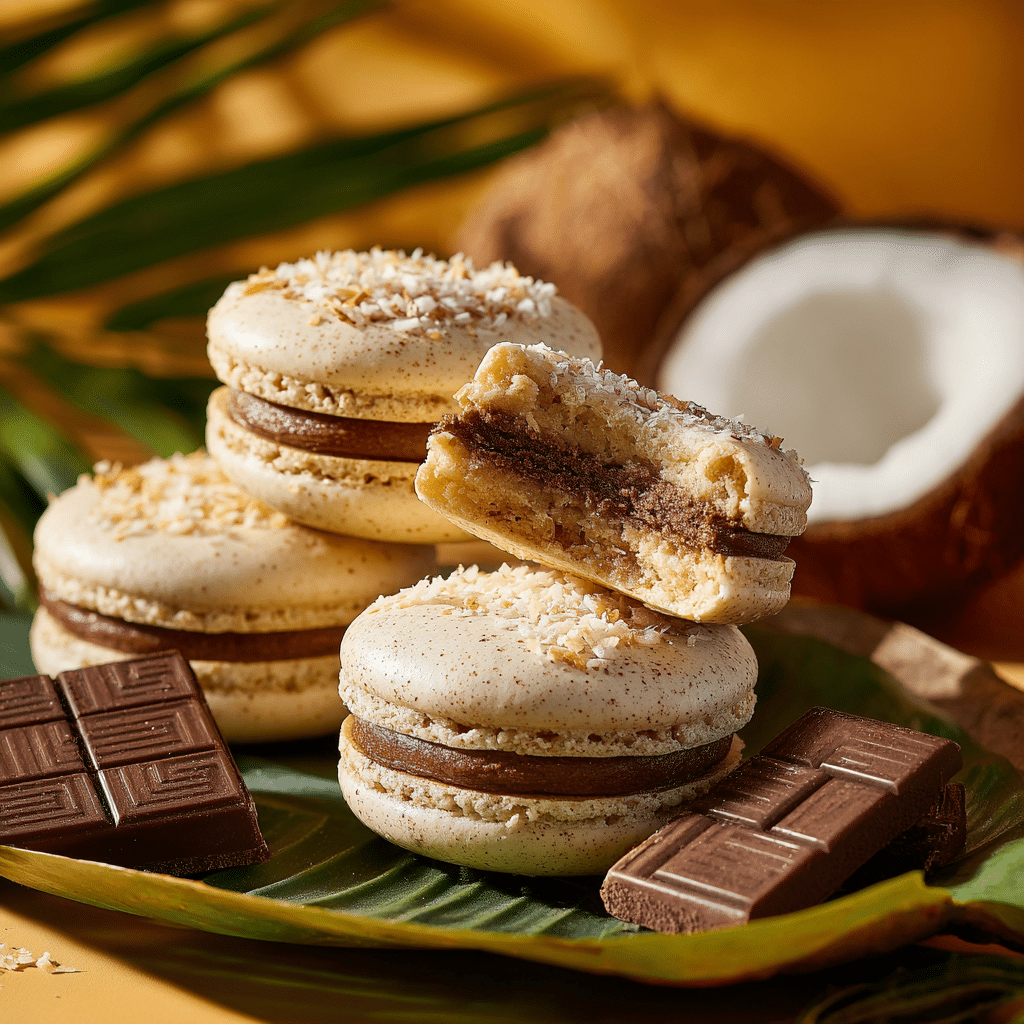
If you adore delicate French sweets and crave a twist that brings a tropical, creamy surprise, then you simply must try these Coconut Fudge Macarons. Each bite gives you the perfect blend of light, crunchy almond shells and a luscious, shelf-stable coconut fudge filling that stays delightfully creamy even when the temperatures rise. Whether you’re new to macarons or a seasoned baker, this recipe is a joyful adventure into the world of elegant desserts with a coconutty flair that’s irresistible and utterly memorable.

Ingredients You’ll Need
Gathering your ingredients is the first exciting step, and this recipe calls for beautifully simple yet essential items that work harmoniously to create both that crisp shell and rich, creamy filling. Each ingredient plays a starring role in delivering perfect texture, luscious flavor, and vibrant color.
- Egg whites (100 grams): These create the airy meringue base that gives macarons their signature lightness and structure.
- White granulated sugar (100 grams): Balances sweetness and stabilizes the egg whites for glossy, stiff peaks.
- Almond flour (105 grams): Key for the nutty flavor and tender crumb of the macaron shells.
- Powdered sugar (105 grams): Ensures a smooth texture and helps in combining the dry ingredients perfectly.
- Food coloring: Enhances the visual appeal—gel or powder types work best to maintain batter consistency.
- Sweetened condensed milk (1 can, 396 grams): Forms the creamy, luscious base for the decadent coconut fudge filling.
- Shredded coconut (½ cup + 1 cup): Adds delightful texture inside the fudge and coats the macaron edges for extra coconut goodness.
- Butter (1 tbsp): Contributes smoothness and richness to the coconut fudge filling.
How to Make Coconut Fudge Macarons
Step 1: Prepare the Macaron Shells
Start by assembling all your ingredients and tools. Line your baking sheets and prepare a large piping bag fitted with a half-inch round tip. Sifting your almond flour and powdered sugar is crucial—it ensures your shells will be smooth and even, without any lumps. Next, whisk your egg whites and sugar over a gentle simmering water bath until the sugar dissolves completely but be sure not to overheat to avoid any shell imperfections.
Step 2: Whip Your Meringue
Transfer your warm egg white mixture to a stand mixer and gradually increase the speed, whipping the mixture until it becomes a glossy and stiff meringue with peaks that stand up proud. Stiff peaks are your sign that air has been perfectly incorporated without overdoing it, setting the stage for fantastic macaron shells.
Step 3: Fold in Dry Ingredients and Color
Gently fold your sifted almond flour and powdered sugar into the meringue using a spatula, forming a smooth, shiny batter. Add your gel or powder food coloring at this point, folding carefully but thoroughly—your batter should flow slowly off the spatula but hold its shape. Use the classic “figure 8” test to nail the perfect consistency; this step takes patience but makes all the difference.
Step 4: Pipe and Rest the Shells
Pipe the batter onto your lined baking sheets using the macaron template as your guide. Once piped, bang the trays lightly on the counter to release any trapped air bubbles and use a toothpick to pop any remaining bubbles. Let the shells rest until they develop a dry skin on top—this usually takes 20 to 40 minutes and helps create those iconic “feet” during baking.
Step 5: Bake the Shells
Bake your macaron shells one tray at a time at 315°F, carefully rotating trays halfway through to ensure even baking. Your perfect shells will have risen feet and a firm, non-jiggly surface. Allow them to cool completely before moving to the indulgent filling stage.
Step 6: Make the Coconut Fudge Filling
Combine the sweetened condensed milk, butter, and half a cup of shredded coconut in a saucepan. Stir constantly over medium heat to prevent sticking, cooking until the fudge mixture thickens considerably and pulls away from the pan’s bottom. Aim for a shiny, firm fudge that holds its shape but remains soft enough to pipe. Let it cool at room temperature for optimal texture—the fudge should never be refrigerated or it will harden too much to use.
Step 7: Assemble Your Coconut Fudge Macarons
Fill a piping bag fitted with a round tip with the cooled coconut fudge. Pipe onto the flat side of your shells and sandwich with a matching top shell. Finally, press the edges of each macaron gently into shredded coconut to create a beautiful finishing touch and an extra burst of coconut flavor and texture.
How to Serve Coconut Fudge Macarons

Garnishes
Sprinkle some toasted shredded coconut on top if you want to amp up the coconut aroma and add a slight crunch. You can also dust them lightly with edible gold dust or unsweetened cocoa powder for a bit of elegance and contrast.
Side Dishes
These macarons pair beautifully with a simple cup of espresso or a fragrant jasmine tea, allowing the coconut fudge’s richness to shine. For a fun contrast, serve them alongside a fresh fruit salad with tropical fruits like mango, pineapple, and kiwi.
Creative Ways to Present
Place your Coconut Fudge Macarons in a beautiful glass or porcelain dessert stand to showcase their colors and textures. You can also create a charming macaron bouquet by stacking them on skewers interspersed with edible flowers or small mint leaves for a striking centerpiece at your party.
Make Ahead and Storage
Storing Leftovers
Keep your Coconut Fudge Macarons fresh by storing them in an airtight container in the refrigerator. Their texture will remain perfect for up to 4 or 5 days, allowing you to savor these treats leisurely.
Freezing
If you want to extend their life even further, place the macarons in an airtight container and freeze them for up to 1 to 2 months. Thaw in the fridge overnight before serving, ensuring the fudge filling regains its creamy consistency without becoming too hard.
Reheating
Unlike many delicate sweets, these Coconut Fudge Macarons do not require reheating. Enjoy them chilled or at room temperature to fully appreciate the creamy fudge and crisp shells. If coming from the fridge or freezer, let them sit out for 10–15 minutes for the best flavor and texture.
FAQs
Can I make Coconut Fudge Macarons without food coloring?
Absolutely! The recipe works perfectly without food coloring. The macarons will have a natural almond shade, and the creamy coconut fudge filling will provide plenty of flavor and texture to delight your palate.
What if my macaron shells stick to the parchment paper?
If your shells stick, it usually means they haven’t been baked long enough or haven’t rested to form the skin properly before baking. Make sure to let the shells dry before baking, and bake until they come off the parchment easily without tugging.
Can I use fresh coconut instead of shredded coconut?
Fresh coconut has a much higher moisture content, which could affect the fudge’s texture and stability. It’s best to stick with shredded coconut—sweetened or unsweetened according to your preference—to keep the filling consistent.
How do I know when the coconut fudge filling is done?
The fudge is ready when it’s thick, shiny, and pulls away from the bottom of the pan when you tilt it. It should drop from your spatula in firm chunks rather than a smooth ribbon. Be careful not to overcook or it will become too hard to pipe.
Can I prepare the macarons a day ahead?
Yes! Coconut Fudge Macarons actually improve with a bit of resting time as the flavors meld and the shell softens slightly from the filling. Just store them in the fridge in an airtight container and enjoy within a day or two for best results.
Final Thoughts
Making Coconut Fudge Macarons might sound like a grand undertaking, but trust me, it’s absolutely worth every minute of effort. The way the crisp almond shells embrace the creamy coconut fudge filling is pure magic, perfect for impressing friends or treating yourself. Dive in, take your time, and enjoy creating these stunning treats that bring a sunny, tropical feeling straight to your kitchen. Your taste buds will thank you!


