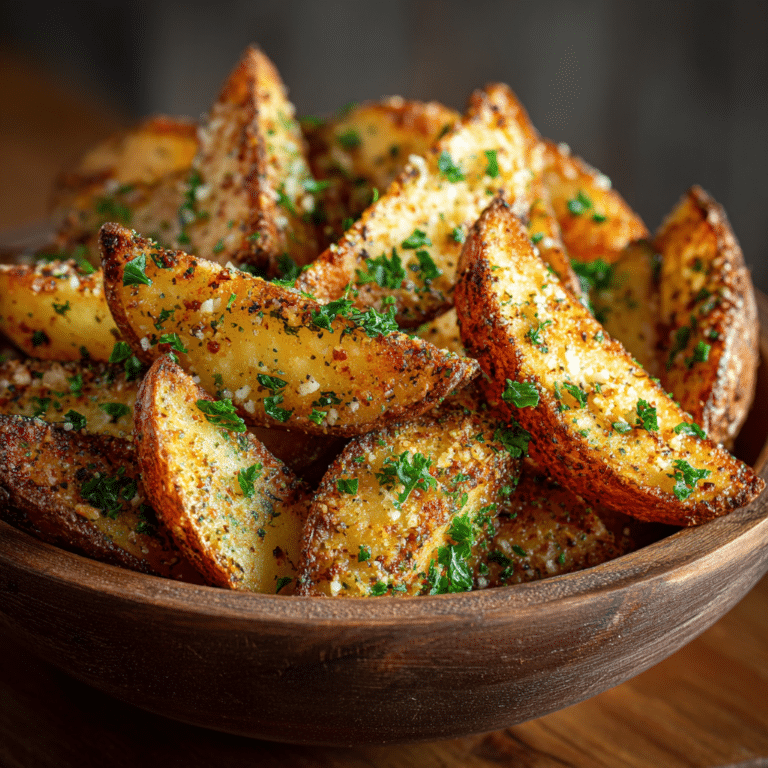
kki – Crispy and Healthy Pressure Cooker Recipe
“`html
If you love snacks that are crunchy, flavorful, and guilt-free, you are going to adore this recipe for kki – Crispy and Healthy Pressure Cooker Baked Aloo Tikki. These tikkis combine the humble potato with vibrant herbs and a perfect blend of spices, all baked to golden perfection instead of fried, making them a wholesome treat. Light on oil but big on taste, this version transforms the classic street food into something you can confidently serve at your next gathering or enjoy as a comforting snack any day.
Ingredients You’ll Need
Keeping the ingredient list simple yet impactful is the secret behind these crispy aloo tikkis. Each component adds its own layer of flavor, texture, or freshness to create a balanced and irresistible bite.
- 3 large Potatoes boiled: The star base, providing a creamy and soft texture once mashed.
- 1 Red onion chopped: Adds a mild crunch and subtle sweetness.
- 1 Green chilli finely chopped: Brings a gentle heat that wakes up the palate.
- 1 inch Ginger grated: Infuses a fresh, zesty kick.
- 2 tablespoon Mint leaves chopped: Offers a cooling, fragrant freshness.
- 2 tablespoon Coriander chopped: Adds an earthy, citrusy layer enhancing the spices.
- 2-3 tablespoon Corn flour: The binding agent that helps keep the tikkis firm and crisp; rice flour can be swapped in if needed.
- Oil for brushing the surface: Ensures a perfectly browned and crispy exterior when baked.
- ¼ teaspoon Turmeric: For a subtle earthiness and beautiful golden color.
- 2 teaspoon Paprika: Adds smoky depth and vibrant hue.
- ½ teaspoon Cumin powder: Brings warmth and nuttiness that ties the flavors together.
- ½ teaspoon Aamchur (dry mango powder): A tangy sour punch; sumac works as a brilliant substitute.
- ½ teaspoon Chaat masala: Delivers classic Indian street snack zing and complexity.
- ½ teaspoon Salt: Balances and enhances all the astonishing flavors.
How to Make kki – Crispy and Healthy Pressure Cooker
Step 1: Prepare the Potato Base
Start by boiling the potatoes until perfectly tender. Once cooled, grate them into a large mixing bowl. Grating instead of mashing ensures a slightly textured bite, which helps the tikkis stay light and crisp.
Step 2: Mix In Fresh Ingredients and Spices
Add the finely chopped red onion, green chilli, and grated ginger to the potatoes. These fresh ingredients bring a vibrant lift to the mild potato base. Next, toss in the chopped mint and coriander leaves for an herbaceous punch that brightens the flavor profile. Sprinkle all the spices along with salt and corn flour into the mix. The corn flour acts like magic, binding everything so your tikkis won’t fall apart during cooking. Mix everything thoroughly until you get a soft, uniform dough that’s full of color and aroma.
Step 3: Shape the Tikkis with Care
Grease your hands lightly with oil to prevent sticking, then shape the potato mixture into small, flat rounds about 2-3 inches wide. Don’t make them too thick, or they won’t cook evenly. Each tikki should have enough surface area to get golden and crispy in the oven or pressure cooker.
Step 4: Bake to Crispy Perfection
Preheat your oven or air fryer to 180°C (350°F). Arrange the tikkis on a baking tray or air fryer basket and brush both sides lightly with oil. This step is key to achieving that sought-after crispy crust without deep-frying. Bake for 25 to 30 minutes, flipping once halfway through the cooking time to ensure an even golden color on all sides. You’ll be rewarded with beautifully crisp and golden tikkis that deliver healthy satisfaction in every bite.
How to Serve kki – Crispy and Healthy Pressure Cooker

Garnishes
Nothing complements these crispy tikkis better than fresh, tangy garnishes. A dollop of cooling mint-coriander chutney or plant-based yogurt sauce on the side elevates the snack with freshness and a bit of creaminess, balancing the spice perfectly.
Side Dishes
Pair these baked tikkis with a crunchy salad or a mild dal to turn a snack into a fulfilling light meal. They also work beautifully alongside a tangy tamarind chutney or a vibrant tomato salsa for guests who like to mix flavors and textures.
Creative Ways to Present
For a party, serve the tikkis stacked on a platter with little bowls of assorted chutneys around. You can also turn them into sliders by adding a small bun and some pickled onions, transforming a humble snack into a fun and flavorful appetizer that everyone will talk about.
Make Ahead and Storage
Storing Leftovers
If you have any tikkis left over, store them in an airtight container in the refrigerator for up to 2 or 3 days. Keeping them cold prevents sogginess and keeps the flavors intact.
Freezing
To keep these delicious tikkis on hand longer, freeze them flat on a baking sheet first, then transfer to a freezer-safe bag or container. They will keep well up to 3 weeks, making them a perfect prep-ahead snack option.
Reheating
When it’s time to enjoy your stored tikkis, the best way to bring back their crispy charm is to reheat them in the oven or air fryer at 180°C for 5 to 10 minutes. Avoid microwaves if you want to preserve their signature crunch and texture.
FAQs
Can I use mashed potatoes instead of grated?
While mashed potatoes can be used, grating helps maintain a slightly coarse texture that crisps up better when baked. Mashed potatoes might make the tikkis softer and less crispy.
Is it necessary to bake instead of frying?
Baking keeps the tikkis much healthier without sacrificing that irresistible crispiness, especially in the context of the kki – Crispy and Healthy Pressure Cooker method. You can pan-fry them for a quicker option but expect a bit more oil usage.
What if I don’t have chaat masala?
Chaat masala adds a tangy and spicy complexity, but you can substitute it with a sprinkle of lemon zest and a pinch of black salt if needed. It’s not exactly the same, but it keeps the flavor lively.
Can I add other vegetables to the mixture?
Absolutely! Grated carrots, finely chopped bell peppers, or even peas can add nutrition and variety. Just be mindful of moisture content so the mixture doesn’t become too wet to shape.
Why use corn flour, and can I skip it?
Corn flour acts as a binder, keeping the tikkis intact and aiding crispness. Without it, the tikkis might fall apart or not crisp as well. If unavailable, rice flour is a great alternative.
Final Thoughts
Making kki – Crispy and Healthy Pressure Cooker baked aloo tikkis is a joyous way to enjoy a classic favorite without the guilt of frying. The combination of fresh herbs, warm spices, and the crunch of a perfectly baked crust creates a snack you’ll want to make again and again. I encourage you to try this recipe and experience firsthand how simple, wholesome ingredients can turn into something truly special. Your taste buds will thank you, and so will anyone you share it with!
“`